


On this page I'll be writing about strange tweaks I sometimes use to solve or "work around" a problem.
Needless to say, of course, that applying any of these tweaks is entirely at your own risk.
Make sure you have a tested full backup available before trying any of these unsupported tweaks.
And always experiment on "non-production computers" first.
I have often wondered why on Earth did Microsoft decide to deliver Windows XP Home Edition with many unsafe security settings as defaults, and without the tools to improve security?
Well, that said, I didn't really bother until I found out that the laptop I wanted was available only with Windows XP Home Edition preinstalled.
"[vendor name] recommends using Windows XP Professional" and then that same vendor delivers XP Home only.
Sounds familiar?
So for a while I used CACLS whenever I needed to change permissions for files or folders.
CACLS is a great tool for setting permissions unattendedly, but I wouldn't recommend for ad hoc use.
So this brings me to the tweaks I found to "restore" Windows Explorer's Security tab:
The easiest way for ad hoc use is to boot the computer in Safe Mode whenever you need to set permissions.
When booted in Safe Mode, the Security tab is always available.
The disadvantage is, of course, that many services are disabled in Safe Mode.
So you don't get the same functionality you have when booted normally until you reboot again.
A better solution is a tip by Gilles Pion on Doug Knox's site: install Microsoft's Security Configuration Manager Tool for Windows NT 4 & 2000 Server on your Windows XP Home Edition.
This work-around is not recommended by Microsoft, but it does seem to work on most systems (unless of course those who tried this and failed were no longer able to send their feedback 😉)...
This work-around may (or may not) downgrade some system files.
This may affect the NTFS file system.
Though no problems have been reported so far, do make a full backup (or at the very least create a system restore point if your local data isn't that important) before trying unsupported workarounds like this!
The most elaborate method I found was one by Reinhard Tchorz, explained by Axel Vahldiek in the July/August 2005 issue of c't Magazine.
I think it is also the safest method, and it can always be undone quite easily.
Too bad it was only published on paper, in the magazine, and not on the magazine's website.
I hope I'm not infringing any copyrights by summarizing:
HKEY_LOCAL_MACHINE\SYSTEM\CurrentControlSet\Control\SafeBoot\Option (which doesn't exist when booted normally) will contain a DWORD value OptionValue=1%windir%\System32\rshx32.dll, after checking if the OptionValue=1 registry value existsrshx32.dll by patching the part that contains the search string OptionValue, replacing it with a slightly changed search string like OptionValuf, and adding this OptionValuf value to the registry under HKEY_LOCAL_MACHINE\SYSTEM\CurrentControlSet\Control\SafeBoot\OptionDid I mention you should make a backup before trying this?
At TackTech.com a simpler alternative is provided.
Willem Koster sent me this tip, accompanied by 2 .REG files that can be used to set and reset the required registry value.
REGEDIT4


		[HKEY_LOCAL_MACHINE\SYSTEM\CurrentControlSet\Control\SafeBoot\Option]

"OptionValue"=dword:00000001REGEDIT4
[HKEY_LOCAL_MACHINE\SYSTEM\CurrentControlSet\Control\SafeBoot\Option]
"OptionValue"=dword:00000000Simple, and no reboots required.
| Warning: | Like all manipulations of the registry, there is always the risk of permanent damage to your configuration. Use entirely at your own risk! Make a backup before trying this, at least a SystemState backup, but preferably a full image backup. |
When my wife's 120 GB harddisk crashed many years ago, I replaced it with a 250 GB model.
Her Windows 2000 installation had problems recognizing the harddisk, so I settled for the 130 GB it did recognize and restored the image backups I had to the new disk.
Some time later, a colleague sent me a link to KnowledgeBase article Q305098, which explains how to make Windows 2000 (SP2 and earlier) aware of harddisk capacity over 137 GB.
So when I had to reinstall Windows 2000 again recently, I decided to give it a try.
First of all I made sure the BIOS was up to date and could handle these large capacity disks.
Then I added the registry value from the Knowledge Base article in the existing Windows 2000 installation, rebooted and checked the harddisk in Windows' Disk Management console. Sure enough, there was en extra 128 GB of unpartitioned disk space available.
I removed the extended partition with the logical drives and recreated the extended partition, this time using all available disk space.
I created an extra logical drive to contain several installation files and, for the near future, the image backups of the system partition.
Did I mention you should make a backup before doing this?
The Windows 2000 installation CD was at SP2 level, so it still couldn't handle the large capacity during setup.
By keeping the primary system partition (C:) below the 137 GB boundary, this was no problem. After installing Windows 2000 I immediately added the registry value mentioned in the Q305098 KnowledgeBase article.
After the reboot, Windows did recognize the extended partition and the first logical drive (that both started below the 137 GB boundary), but reported all disk space of logical drives beyond this 137 GB boundary as available empty space.
For the time being I ignored this and installed SP4.
I suspect it wouldn't have been wise to use any logical drive beyond the 137 GB boundary at that moment.
After the reboot, the lost logical drives reappeared as if by magic, including their data.
I own a Canon EOS 50D camera, and take lots of pictures with the quality (resolution) set to maximum.
Copying the contents of my 32GB CompactFlash cards to my hardddisk may take a while, if I had a lucky day.
That is why I bought myself a Addonics SATA CF adapter plus Silicon Image hot-swappable SATA controller, which made copying much faster, since this CF card reader uses a SATA interface instead of USB 2.0.
That was back in the XP era.
After moving the hardware to my new Windows 7 computer, I discovered that the CF card reader was no longer hot-swappable.
After some experimenting I found that I could use the following command to allow hot-swapping again:
ECHO List Volume| DISKPART.EXE
It had to be run each time a card was inserted or ejected.
Well, at least it worked.
A couple of weeks later I read this article SATA: Hot Plugging Drives Under Windows 2000/XP, and found HotSwap!, which adds a nice GUI/tray icon.
Perfect! Works like a charm.
Thanks Kazuyuki Nakayama
| Update: | After a while, the solution described here failed to work in Windows 7. I bought myself an USB 3.0 card reader, which after a while got some problems too. Later I found out a defective mouse was causing the problem, but by then I already tried tweak 7. |
Since I installed HP LaserJet P2050 drivers and monitor software, I regularly get annoying popups with ads for HP care pack.
These popups appear randomly at startup.
Trying to change the (privacy) settings redirected me to a website, where I had to agree to terms that would be shown after entering the site, for which I had to agree to the terms I could not see.
I have seen better marketing!
The source of the popup ads is HP ToolBoxFX, which monitors the printer status.
As I did not want to completely remove all HP ToolBoxFX functionality, I started digging in the Run section of the registry, where HP ToolBoxFX is started.
Based on some experiments and on the feedback the program gave, I think the part marked red is the part that needs to be changed (i.e. removed).
[HKEY_LOCAL_MACHINE\SOFTWARE\Wow6432Node\Microsoft\Windows\CurrentVersion\Run]
"HP Software Update"="\"C:\\Program Files (x86)\\HP\\HP Software Update\\HPWuSchd2.exe\""
"HPPQVideo"="\"C:\\Program Files (x86)\\HP\\ScheduledLaunch\\HP LaserJet P2050 Series\\bin\\hppschlnch.exe\" -r SOFTWARE\\Hewlett-Packard\\ScheduledLaunch\\LJ_P2050_Series -f PQOptimizerVideo.xml -o RemindLater"
"ToolBoxFX"="\"C:\\Program Files (x86)\\HP\\ToolBoxFX\\bin\\HPTLBXFX.exe\" /enum:on /alerts:on /notifications:on /fl:on /fr:on /appData:on /tmcp:on"
For 32-bit Windows this will look like:
[HKEY_LOCAL_MACHINE\SOFTWARE\Microsoft\Windows\CurrentVersion\Run]
"HP Software Update"="\"C:\\Program Files\\HP\\HP Software Update\\HPWuSchd2.exe\""
"HPPQVideo"="\"C:\\Program Files\\HP\\ScheduledLaunch\\HP LaserJet P2050 Series\\bin\\hppschlnch.exe\" -r SOFTWARE\\Hewlett-Packard\\ScheduledLaunch\\LJ_P2050_Series -f PQOptimizerVideo.xml -o RemindLater"
"ToolBoxFX"="\"C:\\Program Files\\HP\\ToolBoxFX\\bin\\HPTLBXFX.exe\" /enum:on /alerts:on /notifications:on /fl:on /fr:on /appData:on /tmcp:on"
While at it, I also removed the annoying HPPQVideo reminder.
[HKEY_LOCAL_MACHINE\SOFTWARE\Microsoft\Windows\CurrentVersion\Run]
"HP Software Update"="\"C:\\Program Files (x86)\\HP\\HP Software Update\\HPWuSchd2.exe\""
"ToolBoxFX"="\"C:\\Program Files\\HP\\ToolBoxFX\\bin\\HPTLBXFX.exe\" /enum:on /alerts:on /notifications:on /fl:on /fr:on /appData:on"
| Note: | Before editing registry settings, save them by exporting them to a .REG file first. This will allow you to easily restore the original registry settings, if necessary. And always make sure you have a verified backup available. |
For several reasons, instead of buying a new one, I recently upgraded my 6 year old laptop from Windows XP to Windows 7.
Of course, I used the Windows 7 Upgrade Advisor first, to make sure the upgrade would be possible at all.
It told me I should download a new version of the network driver, the rest would be no problem.
You may have guessed by now: of course there was an unexpected challenge.
Somehow, for some obscure reason, OEM manufacturers (i.e. most laptop builders) do not allow ATI's Catalyst driver to be installed on their computers.
So, even with the ATI driver known and "trusted" by the Windows 7 Upgrade Advisor, it could not be installed, leaving me with a 1280x800 screen displaying at 800x600.
Enter ATI Mobility Modder by Ruud Ketelaars.
This tool allows you to download an "ordinary" non-OEM version of an ATI driver, and then modifies it so it can be installed on your laptop.
Like most tools: read and follow the accompanying instructions, do not start blindly!
My laptop display now happily works at 1280x800.
Thanks Ruud!
Recently I had to replace my video card due to a broken fan.
I swapped it with a fanless video card of a different brand, which I scavenged from my old PC.
The "new" video card had never caused any problems before, but after placing it in my current PC, the PC became slow and unstable:
Updating/reinstalling drivers did not help, nor did removing all old drivers.
My own ChkPath.vbs to the rescue.
By running this script, I found out that uninstalling the old driver had removed the files and folders, but not the old PATH entries that now pointed to non-existing folders.
After allowing the script to correct this, the computer worked like a charm again.
| Note: | Besides my "classic" ChkPath.vbs script, written for and tested in Windows 7, you can now also use my more recent CheckPath.exe tool. |


For a while I have been the owner of a All-In-One USB 2.0/eSATA dual 2.5/3.5 inch harddisk docking station (see image at the right).
This piece of equipment worked miracles when I replaced my laptops' harddisks: no reinstall required, just press the button and copy the original disk's partitions to the new harddisk.
As a docking station, it comes with both USB 2.0 and eSATA connections; if I were to buy one today, I would probably opt for the USB 3 model.
Anyway, by adding an under 6 dollar Compact Flash to SATA converter (see image at the right) I can now use the docking station as a fast eSATA CF card reader.
Since an upgrade to Windows 8 only cost € 30,00 I thought I might as well take the plunge and upgrade my Asus EEE-PC 1008HA, my last surviving XP machine.
The Windows 8 Upgrade Assistent did a great job, and the upgrade was painless (though slow).
The Upgrade Assistent warned me that the EEE-PC's 1024x600 screen resolution was too low to run Metro Apps.
I figured I would find a Windows 8 compatible virtual 1024x768 screen driver, like the one it had in XP.
If not, no big deal, I would just have to use a different RAW photo editor.
And I did find it!
Just download and install Internal_VGA_Intel_32bit_8.15.10.1912.zip, reboot, and change the screen resolution from its new 1152x864 back to 1024x768.
This was for my Asus EEE-PC 1008HA; for the Asus EEE-PC 1001PX "SeaShell" look at the Update section below.
Of course, you don't get more pixels on the screen, so everything may look a bit squashed, but at least your apps will run.
I also wrote a batch file (SwitchRes.bat) that toggles between 1024x768 and 1024x600.
Pin it to the Start screen and the Taskbar to switch easily.
The batch file requires Ian Sharpe's SetRes command line tool.
Thanks Ian
| Notes: | 1 | Before installing the Intel driver, make sure it supports your Netbook's graphics card. |
| 2 | I used this tweak successfully on an Asus EEE-PC 1008HA. Unfortunately, it did not work on an Asus EEE-PC 1001PX "SeaShell". |
|
| Update: | After applying the registry tweak for Windows 8.1 (Tweak 9, below) on my Asus EEE-PC 1008HA Netbook, I wondered if that could also solve the problem on a friend's Netbook, an Asus EEE-PC 1001PX "SeaShell". At first it looked like it made no difference, until I downloaded and installed the older Intel Graphics Media Accelerator 3150, Version 15.12.75.50.7.2230/8.14.10.2230 for Windows 7* 32-bit driver (that's right, for Windows 7!). I ignored the warning that this version is older than the one already installed, and it worked like a charm! |
|
Upgrading from Windows 8 to 8.1 was not as painless as upgrading from XP to 8.
First, it required me to uninstall VIPRE Anti-Virus before continuing.
Next I found out the hard way, when forced to create a Microsoft account to log in for the first time after the upgrade, that aborting meant a completely automated roll-back of the upgrade, no questions asked.
What I should have done, and did the second time, was open the "Create a new account" dialog, and then immediately scroll all the way to the bottom of the screen and click "I want to keep my current account".
Then I found out I could no longer set the screen resolution to 1024x768 (Tweak 8), which is required to run Metro style apps, or in my case Canon's RAW photo editing sofware.
Brad Linder to the rescue.
It turned out there are several places in the registry where a binary value named Display1_DownScalingSupported should be set to 1.
Brad's computer had 2 entries, mine had 6 of them, probably because I tried to install a driver from the old Windows 8 installation twice.
Only one of these values not set to 1 prevented changing the screen resolution.
A simple command to find all occurrences of Display1_DownScalingSupported on your computer is (note the * instead of 1, in case more displays are involved):
REG Query HKEY_LOCAL_MACHINE\SYSTEM /f Display*_DownScalingSupported /s /t REG_DWORD
In my case the output looked like this, the value that needed modification highlighted in red:
HKEY_LOCAL_MACHINE\SYSTEM\ControlSet001\Control\Class\{4d36e968-e325-11ce-bfc1-08002be10318}\0000
    Display1_DownScalingSupported    REG_DWORD    0x0

HKEY_LOCAL_MACHINE\SYSTEM\ControlSet001\Control\Video\{0907E28F-9B81-4498-A1A9-73542D212802}\0000
    Display1_DownScalingSupported    REG_DWORD    0x1

HKEY_LOCAL_MACHINE\SYSTEM\ControlSet001\Control\Video\{0907E28F-9B81-4498-A1A9-73542D212802}\0001
    Display1_DownScalingSupported    REG_DWORD    0x1

HKEY_LOCAL_MACHINE\SYSTEM\CurrentControlSet\Control\Class\{4d36e968-e325-11ce-bfc1-08002be10318}\0000
    Display1_DownScalingSupported    REG_DWORD    0x1

HKEY_LOCAL_MACHINE\SYSTEM\CurrentControlSet\Control\Video\{0907E28F-9B81-4498-A1A9-73542D212802}\0000
    Display1_DownScalingSupported    REG_DWORD    0x1

HKEY_LOCAL_MACHINE\SYSTEM\CurrentControlSet\Control\Video\{0907E28F-9B81-4498-A1A9-73542D212802}\0001
    Display1_DownScalingSupported    REG_DWORD    0x1

End of search: 6 match(es) found.
After modifying this value and rebooting the netbook, I could set the screen resolution to 1024x768 again.
Thanks Brad
When Windows 8 "Spring 2014" update (KB2919355) failed with error 80070002 on my EEE-PC netbook, the Windows Update help mentioned an interrupted internet connection as the most likely cause.
So I downloaded the entire package and started a local installation, just to have it fail with the exact same error code.
I spent hours trying to solve the problem but finally gave up, hoping a solution would become available in the near future.
A couple of months later (the netbook isn't used very often) I decided to give it another try: same error code, despite the addition of "clearcompressionflag.exe" to the update package.
Fortunately, this time my Google search did return a useful link: Andrey Tarasevich found the cause.
It turns out that moving the Start Menu subfolders "Administrative Tools" and "System Tools" (which I did a long time ago) causes the update to fail with the uninformative error message.
In my case, running the commands
MD "%ProgramData%\Microsoft\Windows\Start Menu\Programs\Administrative Tools"

MD "%ProgramData%\Microsoft\Windows\Start Menu\Programs\System Tools"
was all that was needed to fix the problem, after that the update installed flawlessly.
After the update is installed, the folders may be removed again.
There may be other issues in other cases, check your %windir%\Logs\CBS\CBS.log (this may take a while).
I used the command
FIND "C:\ProgramData" %windir%\Logs\CBS\CBS.log
to find out if more Start Menu subfolders were missing (there weren't).
It's simple, once you know how...
Thanks Andrey
Usually, if I have to delete an entire directory tree, I use Windows' RD (a.k.a. RMDIR) command:
RD /S /Q d:\keep_parent\delete_this_dir
Sometimes, however, I get a "path too long" error message, in which case neither RD nor Explorer will be able to delete the directory tree.
An ingenious workaround comes from wbkang on StackOverflow.com:
MD "d:\keep_parent\Empty"
ROBOCOPY.EXE "d:\keep_parent\Empty" "d:\keep_parent\delete_this_dir" /MIR
RD "d:\keep_parent\Empty"
RD "d:\keep_parent\delete_this_dir"
It may help to run these commands with elevated privileges.
Thanks wbkang, you saved my day!
Recently my computer would be unusable for at least 20 minutes after logging in: the screen would freeze and/or go blank, and often a message would pop up stating the display driver had crashed and recovered.
I first suspected a recent display driver update, but restoring the old one did not solve the problem.
I tried several optimizations, but the problem persisted.
Then I started running Task Manager's Processes list full time and full screen on my second monitor to try and find out which processes were involved when the screen froze.
This left me with only 2 suspects: the real-time virus scanner and CompatTelRunner.exe.
Googling for CompatTelRunner.exe I learned that:
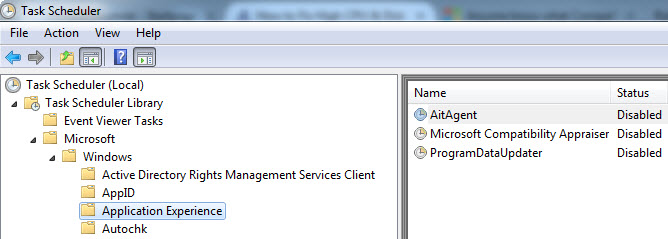
I tested disabling the tasks, and the performance improvement was dramatic, so this change is here to stay, at least for now.
As you may have guessed, I wrote a batch file to automate disabling these scheduled tasks: DisableCompatTelRunner.bat.
Run it without command line arguments to disable the tasks, or with the /R switch to reenable them.
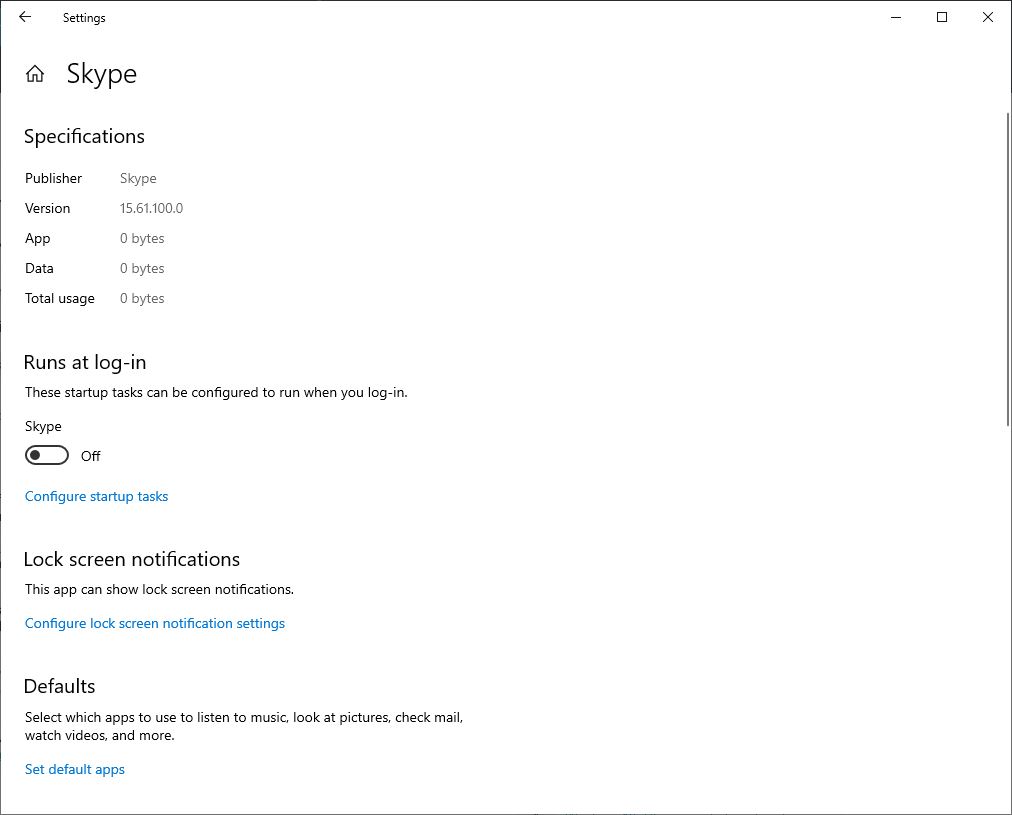
Today my wife started her computer to participate in an online meeting, when a nagging screen about Microsoft services popped up.
As she didn't know what to do, she could not enter the meeting.
I advised het to "tell" the popup to remind her in 3 days, so she could at least continue.
I searched for a permanent solution to this nagging issue, and found not one but two.
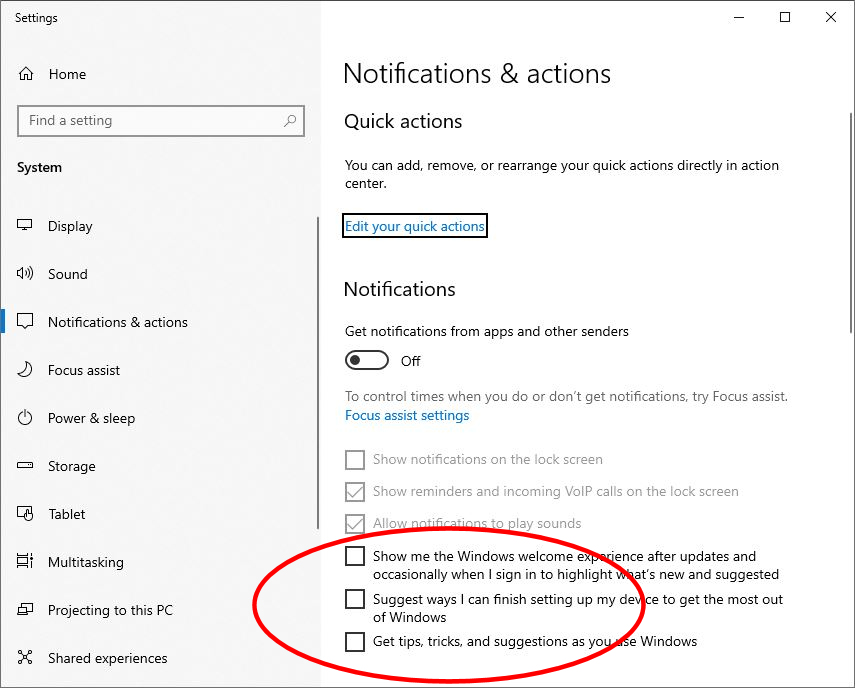
The first, and easiest one comes from Sean Endicott on WindowsCentral.com: Windows 10 showing prompt to sign up for Microsoft services? Here's how to stop it.
In short: open Windows' Notifications settings and uncheck at least checkboxes number 4 (Show me the Windows welcome experience after updates...) and 5 (Suggest ways I can finish setting up my device...).
| Note: | The locations of these checkboxes may change with future Windows updates |
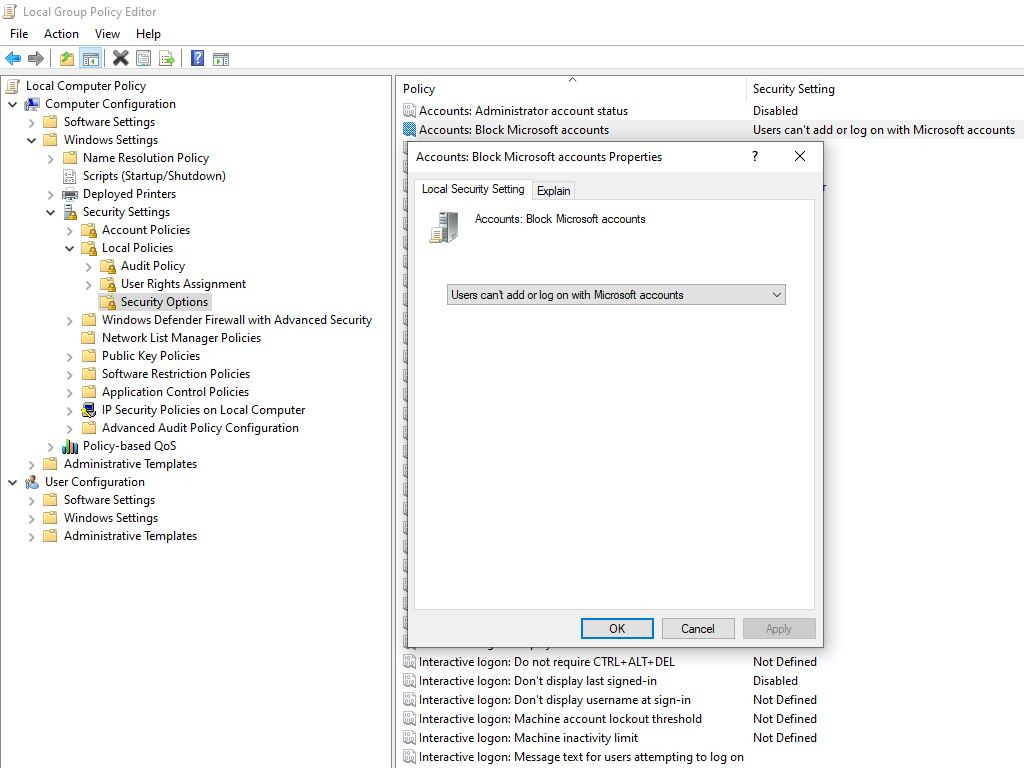
The second solution, which is not for the faint-of-heart, comes from Geek-Pride on Microsoft's Community forums: Disable Microsoft Account Nagging.
Though the original question was asked over 8 years ago, and was about Windows 8.1, it still seems to work in Windows 10 21H2.
In short: open the Local Group Policy Editor (GPEDIT.MSC) with elevated privileges and navigate to Local Computer Policy > Computer Configuration > Windows Settings > Security Settings > Local Policies > Security Options.
In the right pane, doubleclick Accounts: Block Microsoft accounts and select Users can't add or logon with Microsoft accounts.
Click OK to confirm and close the Local Group Policy Editor.
Thanks Sean and Geek-Pride
This week I noticed that some of Windows 10's system tray icons on my PC remained blank: they did occupy some space, they did work, but there were several icons missing, making it really hard to find the required icon in the system tray.
Craig Kraus to the rescue: his tip to clear 2 registry values in HKEY_CURRENT_USER\SOFTWARE\Classes\Local Settings\Software\Microsoft\Windows\CurrentVersion\TrayNotify solved the issue.
Of course I could not resist the temptation to automate the process with a batch file:
:: Based on a tip by Craig Kraus
:: https://community.spiceworks.com/how_to/36510-how-to-fix-blank-system-tray-icons
:: First, create a backup: if anything goes wrong, doubleclick the file "backup_traynotify.reg"
REGEDIT.EXE /E "backup_traynotify.reg" "HKEY_CURRENT_USER\SOFTWARE\Classes\Local Settings\Software\Microsoft\Windows\CurrentVersion\TrayNotify"
:: Next remove the two damaged registry values
REG.EXE Delete "HKEY_CURRENT_USER\SOFTWARE\Classes\Local Settings\Software\Microsoft\Windows\CurrentVersion\TrayNotify" /v IconStreams /f
REG.EXE Delete "HKEY_CURRENT_USER\SOFTWARE\Classes\Local Settings\Software\Microsoft\Windows\CurrentVersion\TrayNotify" /v PastIconsStream /f
:: Finally restart Explorer
TASKKILL.EXE /IM explorer.exe /F
START explorer.exe
Thanks Craig
pslist v1.3 - Sysinternals PsList

		Copyright (C) 2000-2012 Mark Russinovich

		Sysinternals - www.sysinternals.com


		Processor performance object not found on MYPC

Try running Exctrlst from microsoft.com to repair the performance counters.LODCTR.EXE /RFinal-Recipient: rfc822;obfuscated.recipient@zoho.com
Action: failed
Status: 5.6.1
Diagnostic-Code: smtp;554 5.6.1 Body type not supported by Remote Host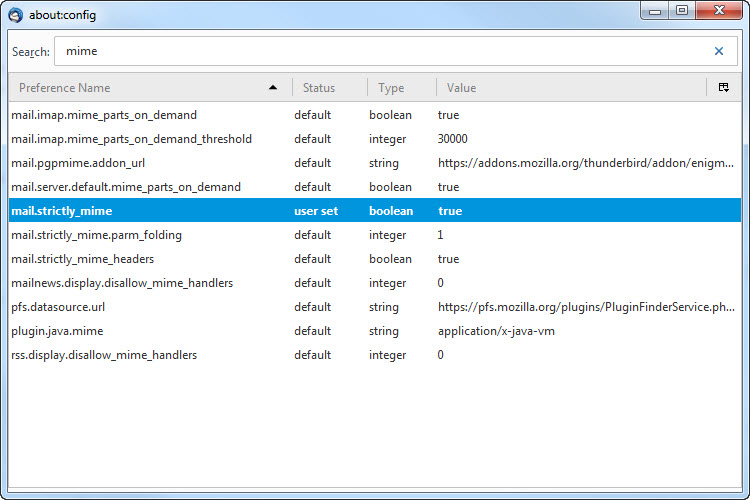
mail.strictly_mime looked like a good starting point, so I set it to true.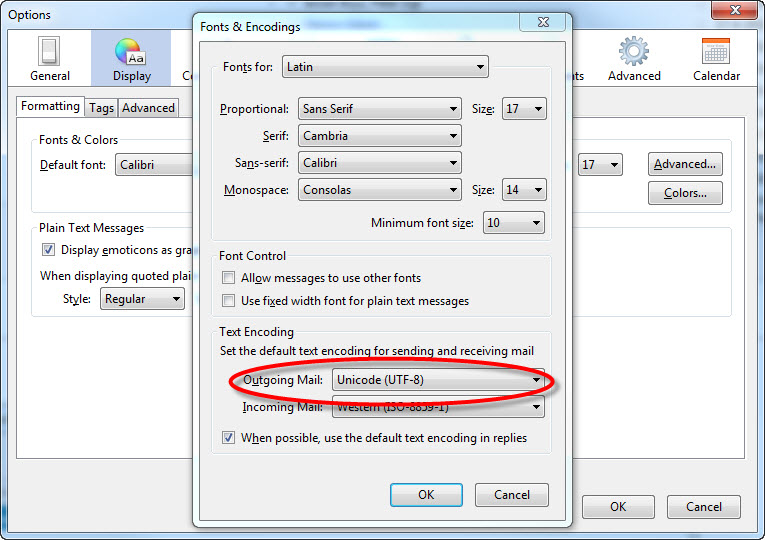
mail.strictly_mime to true and mailnews.send_default_charset to UTF-8.https://apidata.googleusercontent.com/caldav/v2/youraccount@gmail.com/events

PROCMON I found hints that it was trying to check WordPerfect's activation online - not a big surprise, come to think of it.
So I unplugged the network cable, started WordPerfect, which then opened with a new dialog offering me a choice between activation via internet, phone or (snail) mail.
I plugged the cable back in, waited for the connection to be restored, and chose the internet activation.
Five seconds later the problem was solved.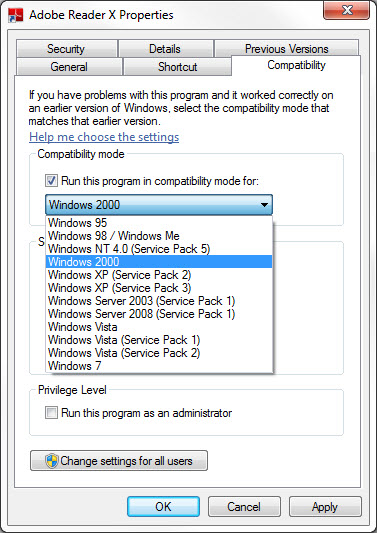
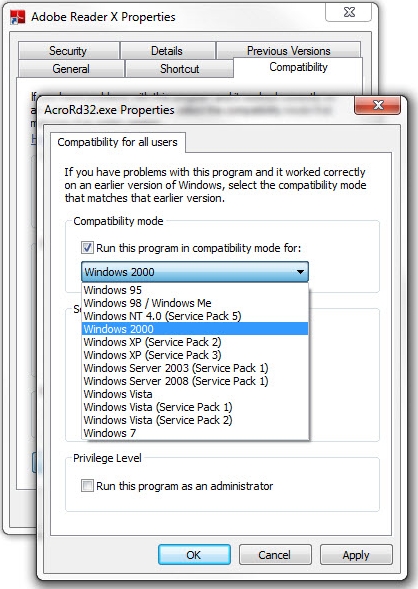
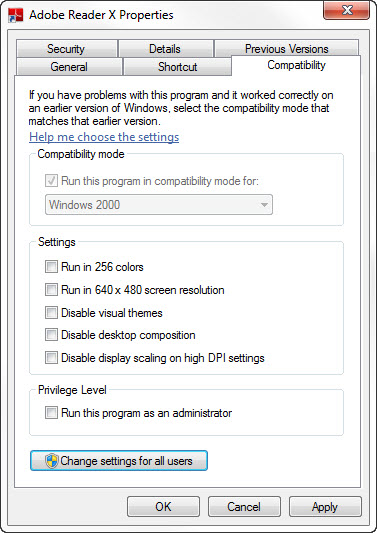
AppCompat.bat "C:\Program Files\Adobe\Reader 10.0\Reader\AcroRd32.exe" Win2000AppCompat.bat "C:\Program Files (x86)\Adobe\Reader 10.0\Reader\AcroRd32.exe" Win2000
page last modified: 2022-10-22; loaded in 0.0090 seconds


